

![]() RPG CHARACTERS
RPG CHARACTERS
![]() Wastiche, Cadrusat
Wastiche, Cadrusat
![]() Magnus the Stod
Magnus the Stod
![]() Psion Stalker
Psion Stalker
![]() Nudie Girl
Nudie Girl
![]() Busty Susan
Busty Susan
![]() Prince Almare
Prince Almare
![]() EXPERIMENTS
EXPERIMENTS
![]() Rock-Oni
Rock-Oni
![]() Otyugh Reborn
Otyugh Reborn
![]() 15mm Paladin
15mm Paladin
![]() Blue Meanie
Blue Meanie
![]() OLDER EFFORTS
OLDER EFFORTS
![]() Plague Bearer
Plague Bearer
![]() Plague Victim
Plague Victim
![]() Fluffy the Demon
Fluffy the Demon
![]() Chaos Warrior
Chaos Warrior
![]() Bubba Junior
Bubba Junior
![]() Slaanesh Champion
Slaanesh Champion
![]() Otis the Thing
Otis the Thing
![]() Undead Dragon
Undead Dragon
![]() Chronopia Orc
Chronopia Orc
![]() Everhungry
Everhungry
![]() Demon Steed
Demon Steed
![]() Karlinn
Karlinn

![]() Great Cthulhu
Great Cthulhu
![]() Great Cthulhu (2)
Great Cthulhu (2)
![]() Great Cthulhu (3)
Great Cthulhu (3)
![]() Great Cthulhu (4)
Great Cthulhu (4)
![]() The Irdulan
The Irdulan
![]() Koshka (RPG Char)
Koshka (RPG Char)

![]() Mini Photography
Mini Photography
![]() Converting Minis
Converting Minis
![]() Fiber Optic Lights
Fiber Optic Lights

![]() REFERENCES
REFERENCES
![]() Arms & Armor
Arms & Armor
![]() Book Reviews
Book Reviews

![]() All About Me
All About Me
![]() Frothing FU!UKers
Frothing FU!UKers
![]() The Addict's Lair
The Addict's Lair
![]() The NEW Lair
The NEW Lair
![]() Send Feedback
Send Feedback
![]() Cool Mini Ratings
Cool Mini Ratings

![]() HOBBYISTS
HOBBYISTS
![]() Miniature-Painting
Miniature-Painting
![]() Jen Haley, Paintrix
Jen Haley, Paintrix
![]() Dirk Stiller
Dirk Stiller
![]() Mini-Painter List
Mini-Painter List
![]() Glyn Evan's Site
Glyn Evan's Site
![]() Deus Ex Machina
Deus Ex Machina
![]() Holger Schmidt
Holger Schmidt
![]() Warpaint Studio
Warpaint Studio
![]() Craig Stocks
Craig Stocks
![]() Blaze's Corner
Blaze's Corner
![]() COMPANIES
COMPANIES
![]() Reaper Miniatures
Reaper Miniatures
![]() RAFM Miniatures
RAFM Miniatures
![]() Dixie Art
Dixie Art
![]() Fantization Store
Fantization Store
![]() Cyberdungeon
Cyberdungeon
![]() Hudson & Allen
Hudson & Allen
![]() MD. STORES
MD. STORES
![]() Dream Wizards
Dream Wizards
![]() Games,Comics,Stuff
Games,Comics,Stuff
![]() REFERENCE
REFERENCE
![]() Miniatures Atlas
Miniatures Atlas
![]() Frothers Unite! UK
Frothers Unite! UK
![]() Cool Mini, or Not?
Cool Mini, or Not?
![]() F.A.R.P Resource
F.A.R.P Resource
![]() The Miniatures Page
The Miniatures Page

|
VISIONS IN COLOR: EIGHT 02/2003
The Visions In
Color gallery is a showcase of the best the Mini-Painter
list
has to offer. All participants are given the exact same miniature and then
allowed to do whatever they want to it. At the end of the working period
the results are put up on Dominic Heutelbeck's site and everyone can
leave feedback for the painter.
 Well, I always seem to make these things more difficult than they should be and this time was no exception. I wanted to convert Zeiren into a god from my RPG game- Cerideth, the god of Malevolance. I used the body from an RAFM Leng Spider, some chains from a model ship supply, bend straight pins for hooks, twisted brass wire for rope, and some clothes from an Inquisitor model. The figure went together pretty smoothly and I started painting him and he came along at a frightening clip. I gave the spider body a mottled texture that I copied from an octopus... I was admiring how it turned out and then... I dropped him. Onto concrete. I worked all weekend to repair the damage to the piece and to help me work on the guy I mounted a 4" brass rod into the underside. I held this with vise-grips while doing touch up, and while regluing the two claws back on. Well, when he was touched up and ready to photograph I snipped off the brass rod to about 1/4" away from the body. This would let me test him on the base, but still let me hold him with the pliers if something popped off. When I was satisfied that he was truly done I snipped off that last 1/4" of brass rod. I was wearing safety glasses, of course. And the Power of The Curse hit and skipped that sharp piece of brass rod right into my right cornea. Now, I've been struck in the nether-regions by baseballs, gotten clocked in the jaw with an axe-handle, and I've even had a ceiling fan drop on my head- but nothing has ever hurt so much as that little piece of brass in the eye. Then, of course, there's the panic... much like little Ralphie in "A Christmas Story" "Oh Shit! I shot my eye out!" The thing didn't penetrate that far though. I didn't want to wake my wife up to drive me to the ER, so I tried ignoring it to see if it would get better. I set up the mini, snapped one photo and then decided that I was being stupid. Fortunately we're friends with an opthalmologist and rushed me right into his office. I had a nasty corneal abrasion, but it would heal in a day or so. It's healed enough that I can see and it doesn't hurt (just feels like grit in my eye). So now I can finally see what everyone's VIC entry looks like :) My advice to everyone: Use safety GOGGLES. The glasses didn't do much for me. Without depth perception it's kind of hard to paint these little guys. Public Service Announcement over... 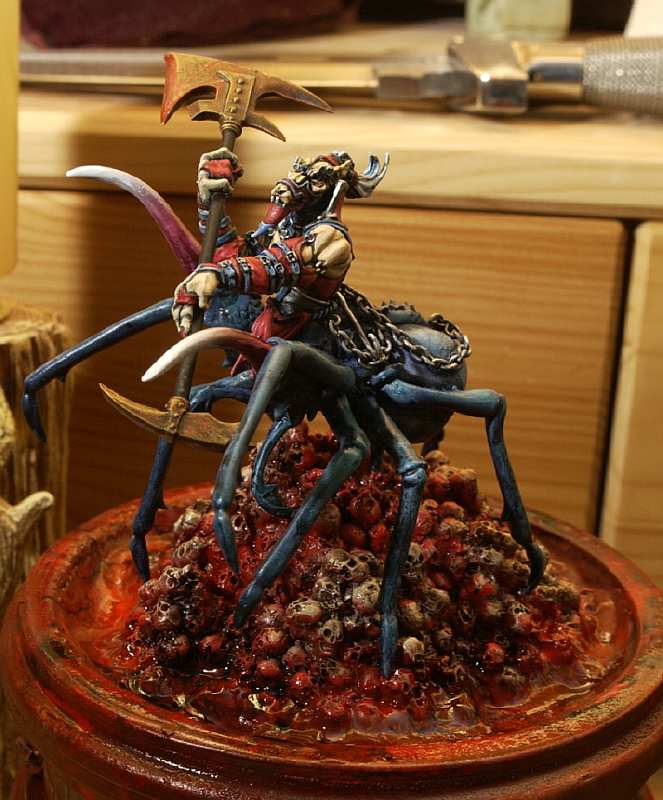 Conversions: I had to carefully cut Zeiren's torso from his waist without destroying any of the detail down there since I wanted to use the legs and such for another piece. This took a bit of time and fifteen (yes, 15) very fine jeweller's saw blades. Once I had his torso off I had to marry it to the body of a Spider From Leng (from RAFM's Call of Cthulhu line). I used a dremel to grind out a socked for him to sit into and then matched up where the pins would go. I pinned him with brass rod. Next I used bluetac to get the arms to stick on (sort of :) ) to see if the "claws" would get in the way of the weapon. I cut off the two fang-like claws and repositioned them using bend brass rod. I resculpted their "sockets" with green stuff. I test fitted the legs to go on the skull base and bent them as needed. Once I was sure of the pose and the leg position I drilled out the body to accept the legs and pinned them with brass rod as well. I built up the waist/spider joint with green stuff and then added the "skirt" from GW's Cherubiel (Inquisitor line). I made a "rope" with twisted brass wire. At this stage Zeiren's torso was on the spider body. The arms and the "claws" were off, and his head was off as well. I began making hooks (ala Hellraiser) out of straight pins by bending them with round-nose pliers. Once I'd made enough I mounted them on a pre-measured length of model-ship chain. The chain was secured into the body with eye-hooks, and then tacked down in spots with superglue. I primed all the pieces to begin painting. The paint job was done with conventional brushes and an airbrush. Most of the spide body was sprayed with an airbrush to get a mottled skin pattern like an octopus I'd seen. The wolfen parts were painted with a regular brush using Vallejo and Reaper Pro paints, FW Inks, and Liquitex Acrylics. I primed the miniature with GW Spray White and Black. I did the underside in Black and then the top in White to give him harsh lighting. Once the primer dried and before painting I gave him a wash in Indigo blue from FW Inks. This effectively did the darklining in one pass. The metals were done with Vallejo's alcohol based metallics, Rustall (God I love this stuff!), and FW inks. The blood streak on the top blade was done by painting some Crimson FW ink onto the leading edge and then blasting a puff of air at it from the empty airbrush. This spattered it nicely. I was several days into painting when and then attached the "claws", the head, and the weapon arms which had all been painted separately. When the glue dried I touched up the area around the new parts and then I dropped him. It all happens in my mind in super slow-motion... complete with musical score... He skittered off the table, bounced off my knee and slammed into the concrete floor. Two legs snapped off, the torso popped off, the weapon arms flew off and the blades bent and snapped... and worst of all he was wearing a fresh coat of cat fur in his fresh paint. Once I'd straightened out the bent pieces, re-pinned and glued the broken ones, and rebuilt the weapon with brass rod I had to deal with the cat-fur (the cat sleeps in the basement). I didn't want to strip him and start over, so I took an electric eraser (sort of a cordless drill with an eraser in it) and buffed out the abrasions, cat-fur, dirt, and other stuff. After some touch up work I was back on track. Then I test fitted him to the base and almost put my eye out. HOW I DID THE BASE: While glues and paints dried during all this I was casting the pieces for the base. I made silicone molds of a skull-pile from Armorcast, some columns from Grendel, and Rackham's guardians of eternity gargoyles. I cut and routed four basswood discs to make the platform, then cut a circle out of the top one and routed it on the inside. The two pieces were glued together to make a kind of "well". The other two discs were glued together to form the bottom platform. In between the two is a disc of styrofoam cut 1/2" smaller than the basswood discs. I cut a strip of brick textured ABS sheet from Plastruct and glued it on the styrofoam with construction adhesive. To make sure the ends met I used a heat gun to soften the plastic and pushed it down with a nail. There are four decorative plaques on the brick section- two skulls I cast out of resin, and two shields from a pack of Anubi Warriors (Wargods of Aegyptus). The resin skulls and shields were sanded with a drum to give them the proper curve in the back to fit onto the curved brick. The platforms were glued together, then each glued to the brick, then the columns glued to the bottom base. On the columns I glued a gargoyle to one face. Once this was done I sanded out any imperfections I could and then primed it black. I painted the base in lighter and lighter coats of white with an airbrush until I'd gotten a good "drybrush" effect and the effect of light coming from above. Then I hit it with two bottles of Rustall over the coarse of two weeks. This gave it a wonderful spotty dried-blood and crud look. I sealed this with Testor's Dullcote. I mixed up equal parts of Woodland Scenic's Water Effects Acrylic and FW Inks' Crimson. I poured this into the well to fill it with blood. I then spent several hours dripping various red inks and thin paints onto the base from several feet above. This gave nice spatters all over, but the basement floor looks like a murder took place there. When all this spattering dried I poured another thin layer of the water/blood mixture into the well and put the skull base in it. I'd painted the base separately. I added some drops of red, brown, and black ink here and there, and blasted them with the airbrush to make them streak and spray. As the "blood" in the well began to cure I used the airbrush (empty) to gently mold ripples and waves into it using only air pressure. When everything was done I sprayed the whole thing with Testor's Dullcote, and then painted on copious amounts of Polly-S' Gloss Varnish where they'd have the most impact. I had fun working on this project, despite nearly poking my eye out, and thanks to everyone else who contributed- now that I can see better I'm going to go check out the other entries! Big thanks to Dominic for hosting the VIC each time, and for extending the deadline for the cursed or procrastinating!
© 2002 Mike McCuen Questions or comments? Email mike@necrosys.com |